
Arduino, with its open-source platform and ease of use, has become a popular choice for developing IoT-based health monitoring systems. From simple heart rate monitors to advanced health monitoring devices, Arduino offers a versatile platform for DIY health solutions. In this guide, we will explore how to build effective health monitoring devices using Arduino, focusing on heart rate sensors and real-time data transmission.
Why IoT-Based Health Monitoring is Important?
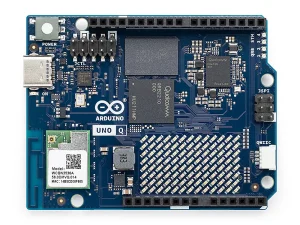
Aging often brings both physical and mental changes, leading to reduced independence. IoT-based health monitoring systems can provide continuous support by tracking vital signs such as heart rate, temperature, and oxygen saturation in real-time. By using an Arduino board like the Arduino UNO R4 WiFi, data can be transmitted wirelessly to cloud platforms, enabling healthcare providers and family members to monitor patients remotely. These systems often include alert notifications to ensure timely medical attention when needed.
See Best Microcontrollers for IoT
Building a Heart Rate Monitor with Arduino
A heart rate monitor is a key component of any IoT-based health monitoring system. By Buying a heart rate sensor Arduino and a compatible board, you can create a simple yet reliable heart rate monitoring device.
Components Needed:
-
Arduino UNO R4 WiFi (or other compatible Arduino boards)
-
Pulse Sensor (PPG sensor such as MAX30102 or BPM280)
-
LCD Screen (optional, for displaying heart rate)
-
Resistors and jumpers
-
Wi-Fi module (if using a non-WiFi board)
Concept:
-
Use a heart rate sensor Arduino like the MAX30102, which works based on photoplethysmography (PPG) to detect changes in blood volume.
-
Connect the sensor to the Arduino UNO R4 WiFi board.
-
Write Arduino code to read and process the sensor data.
-
Display the heart rate on an LCD screen or send it wirelessly to a cloud platform for real-time monitoring.
Challenges:
-
Signal Processing: Accurate detection requires filtering out noise.
-
Sensor Placement: Proper placement of the heart rate sensor is critical for accurate readings.
Building a Digital Thermometer with Arduino
A digital thermometer is another essential component of an IoT-based health monitoring system. Using a temperature sensor with Arduino makes it easy to measure and display body temperature.
Components Needed:
-
Arduino board ( Buy UNO R4 WiFi, Nano 33 IoT, etc. )
-
Temperature sensor Module ( Buy DHT11 or Buy DS18B20 )
-
Resistors and jumpers
-
LCD screen (optional)
Concept:
-
Connect the temperature sensor to the Arduino board.
-
Use Arduino code to read temperature data.
-
Display the temperature on an LCD screen or transmit it wirelessly.
Sensor Pod Placement:


To ensure optimal readings, it’s advisable to snap the sensor pads onto the leads before attaching them to the body. For the most accurate measurements, place the pads as close to the heart as possible. The cables are color-coded to assist in correct lead placement. Buy ECG heart monitoring sensor (AD8232)
Challenges:
- Accuracy: Minimize external factors like ambient temperature to ensure accurate readings.
Building a Basic Health Monitoring System
To create a complete health monitoring Arduino system, you can combine a heart rate monitor, digital thermometer, and additional sensors such as:
-
Blood oxygen sensor ( Buy MAX30102 )
-
ECG heart monitoring sensor ( Buy AD8232 )
-
Accelerometer (for movement detection)
Steps:
- Connect all sensors to the Arduino UNO R4 WiFi board.
- Write Arduino code to collect, process, and integrate data from multiple sensors.
- Transmit the data wirelessly to a cloud platform.
- Set up alert notifications for critical health events.

Components:
- Arduino Uno R4 WIFI board
- PPG sensor
- Temperature sensor ( Buy MLX90614ESF or Buy DS18B20 )
- Accelerometer (optional)
- Blood oxygen sensor ( Buy MAX30102 )
- Resistors
- Jumpers
- Optional: LCD screen, Wi-Fi module, data logging shield
Challenges:
- Data Integration: Combining data from multiple sensors and presenting it meaningfully.
- Power Consumption: Ensuring the device can operate continuously without frequent battery changes.
IoT Cloud Platforms for Health Monitoring
Numerous IoT devices are now available for remote patient health monitoring. Healthcare professionals are increasingly utilizing these smart devices to track patient health. The healthcare industry is undergoing a rapid transformation driven by IoT, with hundreds of new technology startups developing patient health monitoring systems.
In an Arduino-based ECG monitoring device, the IoT cloud plays a crucial role by enabling remote data storage, access, and analysis. The ECG data collected by the Arduino is transmitted to the cloud platform via Wi-Fi or other communication protocols. This allows healthcare professionals to access and monitor patient ECG readings in real-time from anywhere with an internet connection. The cloud also facilitates data storage, enabling long-term monitoring of patient trends and supporting data-driven decision making. Furthermore, cloud platforms can integrate with other healthcare systems, enabling seamless data sharing and improving patient care coordination.
Here some IOT Cloud platforms:

These platforms allow healthcare professionals to remotely monitor patient data and track long-term trends for better diagnosis and treatment. Using a cloud platform is essential for storing and analyzing health data in real-time. With the Arduino UNO R4 WiFi, you can easily connect to cloud platforms.
Important Considerations
-
Safety: Always prioritize safety when working with electronic devices.
-
Accuracy: Ensure accurate sensor readings by calibrating the sensors properly.
-
Data Privacy: Implement secure communication protocols to protect sensitive health data.
Disclaimer:
- The information provided in this article is for educational purposes only.
- The accuracy and reliability of any health monitoring device built using Arduino depend heavily on the quality of components, the accuracy of sensor readings, and the quality of the code.
- These projects are not intended to replace professional medical devices.
Getting Started:
-
Learn Arduino Basics: Familiarize yourself with the Arduino IDE and basic coding.
-
Gather Components: Source necessary components from trusted retailers.
-
Follow Tutorials: Use online guides to build each project step-by-step.
-
Experiment and Improve: Start with simple devices and gradually enhance your system.
By following these steps, you can build your own IoT-based health monitoring system using Arduino. Whether you want to develop a basic heart rate monitor or a comprehensive health monitoring Arduino solution, Arduino offers endless possibilities for DIY health tech innovations.
FAQ
Why is Arduino a good choice for IoT-based health monitoring systems?
Arduino is ideal due to its open-source nature, ease of use, and compatibility with various sensors. It enables real-time data transmission to cloud platforms for remote monitoring of vital signs.
What components are needed to build a heart rate monitor using Arduino?
You will need an Arduino UNO R4 WiFi board, a heart rate sensor (e.g., MAX30102), resistors, jumpers, and an optional LCD screen for displaying the readings.
Related Articles:





5 thoughts on “IoT Heart Rate Monitoring with Arduino UNO R4 WiFi”
Pingback: Smart Home Energy Management with ESP32 and Arduino
Pingback: Best IoT Microcontrollers for 2025 Projects
Pingback: Top 8 Popular Boards for IoT– Expert Guide for Innovations
Pingback: Smart Pet Feeder Using Arduino Uno R4 Essential Guide
Pingback: DIY ESP32 Pedometer with BMI160 Sensor: Battery-Powered